Search

Hannah Walker

Month

September 2015

Research

In this blog I used some of Sally’s Research PowerPoint to help me for each point, however I wrote it in my own words and explained each point from what I already knew about research.

Why research

Research into your project is vital for the industry as it helps you work out what is popular and what isn’t. Audience profiling (grouping your audience into categories), demographics (population of a place), consumer behaviour and attitude, target audience research all help the industry make the products that the audience wants.

Media products are often very expensive and time-consuming to produce, and there are a lot of pressures on the people who plan and make them to get them right. Because of these pressures and demands, media companies put a lot of time and effort into thoroughly researching a product to ensure that it will attract the right audience and that this audience will react to it in the appropriate way. Otherwise they would lose out on a lot of money (especially when making films etc.)

The two main forms of research undertaken by the media are Market Research and Production Research. Each have different purposes and are vital in order to get the research you need.

Market Research is the collection and analysis of information about the market that your product/ project will be in and the competitors you will need to compete with once your project is done. You can research all the opportunities that you could have within your project (that others may have also undertaken), look for your competitors (which are competing for a share of the audience that you want to work with) and see what they’re working on/with and threats that you may have when working.

Production Research is related to the production process itself including research on the budgets in your project, personnel and locations that you will need to use in your project.

Different sources

There are many different sources that you can use to get your research and information that you need. Some of the sources are popular for different reasons such as the cost and how easy it is to get them but also the reliability of the information.

These sources include:

  • Newspapers and Magazines: They are quite popular because they give a lot of recent, reliable data, facts and stats, also they often link to where the original information is from, which also shows that none of the information has been changed or tweaked whilst being published. However, because they are written from one person point of view (the writer), a lot of the data and facts could be changed and then become bias and not accurate data.Pros:
  • recent facts and data
  • easy to get hold of
  • they’re not expensive (cheap)
  • there’s always a lot of accurate information
  • most provide websites and links for extra infoCons:
  • some biased date
  • some info could be changed or tweaked
  • out of data info (inaccurate)
  • some are quite expensive to buy
  • Books: Books aren’t as popular to use to find research, purely based on the fact that they’re usually out dated and inaccurate so the information they give aren’t in date and recent. Although, they’re easy to get (from libraries or book stores) and sometimes cheap.Pros:
  • easy to get hold of
  • usually not bias data
  • sometimes cheap
  • always a lot of data and factCons:
  • can become expensive
  • limited information
  • out of date infoOnline: Online research is the most popular source to use, because there are thousands of ways to find out different information. There are many different types of layouts for example Blogs, Websites, Reviews, Articles, all of which have a range of choice for what you are looking for and give lots of details including facts and data.Pros:
  • quick to find info
  • cheap
  • easy to use (if you have internet connection)
  • range of choice
  • reliable sourcesCons:
  • inaccurate facts
  • time consuming
  • some data may be changed/ tweaked/ bias
  • can get expensive (paying for Wi-Fi etc.)

Primary and secondary sources

A primary source is a source that you have found/made/ yourself, for example instead of using the internet you could go out and find out your own answers. Such as making a questionnaire and handing them out, doing surveys, making your own online survey etc. This means finding out the information yourself instead of relying on another source.

To get primary data/sources you will need to get this yourself as it is research that you go out and collect by yourself. Therefore you will need to create a something that you will be able to give out to people in order to get your results. This could mean making a questionnaire for people to fill in, a survey and interviews. They are cheap and easy to make however it usually takes longer to get the amount of results you want from your research.

A secondary source is a source that has already been made for you to access, for example a book, internet, magazines, newspapers etc. Instead of finding out the information yourself you can use these to give you the information/facts you need for your research.

It is very easy to get secondary data as you can get access to the internet via mobile devices, computers, laptops etc, newspapers are also very easy to get hold of, books can be purchased or borrowed etc. There are many ways to get secondary sources and are all fairly easy and cheap to get hold off.

Using secondary sources may give you some step backs as you are looking for research that has already been done. Sometimes the data you find could be inaccurate, out of date (not recent) and you also may need to ask permission to use their data.

Qualititative and qualitive

Quantitative data is information about quantities; that is, information that can be measured and written down with numbers. Some examples of quantitative data are your height, your shoe size, and the length of your fingernails.

Qualitative data is information about qualities; information that can’t actually be measured. Some examples of qualitative data are the softness of your skin. This information can only be described and not measured, such as descriptions, textures and appearances.


Becoming A Runner

Media
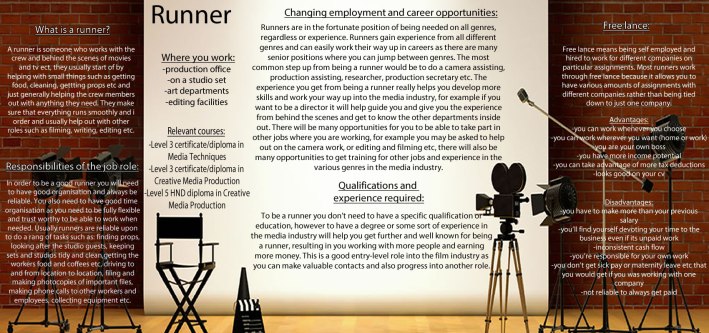
In Kayti’s lesson I produced a poster explaining how to become a runner and certain responsibilities that you need to do in order to become a runner. In this poster I explained what a runner actually is and does, advantages and disadvantages of free lance, the qualifications and experience needed, changing employment opportunities and courses you can take to help you become a runner/ help you get further in the industry. I enjoyed making this poster as it helped me work out whether I wanted to do this as a job and made me research further into different education paths I could take in order to do this job or another job of my choice.

What skills I already have:

  • Confidence
  • Independence
  • Teamwork
  • Creativity
  • Communication
  • Flexibility
  • Problem solving
  • Leadership
  • Time management
  • Motivation

How I will develop the skills I need for this job:
I believe that I have most of the skills I would need to be a runner however to become a runner one thing I would need would be experienced in the industry. In order to get this I would have to go out and find some work experience or a small job as a runner/ small media job to help me get experience.

Video analysis (camera angles)

Video 1:

This video used various different types of camera angles and shots, the focus changed to show the key vocal parts of each scene and the contrast in each shot was different, making the background and focus change in each section of the film.

https://www.youtube.com/watch?v=KonRKfwAmWs

The rule of thirds shot was used to give the audience a greater sense of the scene and created looking space for the character. This shot also made the character stand out as it is the main place point of the interest in the scene. This creates suspense making the audience interested and intrigued into what will happen next in the film.

The close up shot was used to show the emotion that the character was feeling, it allows the audience in close to the scene and characters emotions. The close up is zoomed into the characters face; this evokes sympathy and fear and portrays negative emotions to the audience. This makes the audience feel connected to the character and also makes them empathise towards how the character was feeling.

The pan shot revealed the location, most important characters and objects in the scene. Panning across the shot showed the vastness and setting of the scene. This made the audience feel interested in what else was in the scene and what else would be revealed shortly after the shot.

The Birdseye view shot made the character look small, and made the audience feel sympathy for how small and vulnerable the character looked in the scene. It also showed the contrast in size between the character and other objects in the shot, revealing the weakness and fragility of the character.

Video 2:

In this short film, there were a lot of different shots and angles used, the brightness and contrast in this film was different in every shot and it also used various angles, pans and shots.

https://www.youtube.com/watch?v=ri6XuLgipMw

The establishing shot was used to show and introduce the audience to the vast setting and scene, which the character was in.It also revealed the contrast in vastness of the setting and objects in the shot. This shot made the audience feel interested in what the character can see and what else was in the scene.

the medium shot was used in this film to show the body language of the character and revealed the space between the character and objects in the scene. this shot made the audience realise the most important objects in the scene as they stand out the most.

The rack and pull shot shows the shallow depth of field in the scene and directs the audience to the importance of the objects/ characters. The focus changes from object to object to emphasise what is the most important in the shot. This makes the audience interested in the scene and question why the objects that stood out were the most important.

Production Processes

Pre-Production:

The Pre-Production process is always the first thing to do when creating a film or something media related. This is because in the pre-production process, everything you need to do for your project is planned and organised, so that it runs smoothly and everyone working on the project knows the times, schedules and deadlines for each day.

Each step/scene/day is planned; including where each person needs to be, times each person is working, what they need to do, what needs to be made each day etc. So that everyone knows what needs to be done each day in order to meet the deadlines and timings for the rest of the movie production process.

In this section of the making of the film, there are always lots of different workers trying to complete various different tasks all at the same time. As there are a lot of different tasks that need completing the time limit given, the pre-production process is usually the most full on and busy time of the making of the project.

The pre-production process is always the longest time consuming part of the project and always costs quite a lot of money too. This is down to the amount of planning and equipment needed, staff needed, pay for each worker and planning each shot, scene and everything that needs to happen in the film etc.

Before each project I have been involved in I have needed to plan ahead of schedule to make sure that the work and group(s) are organised and know exactly what each persons roles are etc. This planning has included me making call sheets, role(s) sheets for each person, scripts, etc to help the production process more organised and run smoother.

untitled

Production:

The production in the media process always occurs after the pre-production planning. Everything that was collected in the pre production is made, produced and put together and created to make the production of the movie/programme etc. This could include the production of the photos, films and general scripts, etc, meaning taking the photos and videos, writing the scripts and printing, etc.

The production of each of these has a different person controlling and working on them to make sure that everything is made professionally and to a certain standard. Creating the film includes shooting each shot and putting them together, recording the videos, editing, directing the movie etc.

Even though it would seem that the production process would take the longest amount of time; that is usually not the case. Although, it is usually the most expensive part of the film making process. The production process does take quite a long time to put everything together, but it’s not usually the longest process of the making of the film (including planning etc.)

The equipment used in the Production process usually includes cameras, lighting, video recorders, microphones, tripods, computers, editing software etc (all that is needed for each shot, angle, video, that is wanted in the film/media you are creating.)

I have had a lot of experience which the practical side of production, I enjoy this the most out of the three stages and so I find that my work is also usually quite professional once I have completed my projects/assignments. The productions that I have been involved in are only the projects that I’ve been given as part of the course, however I have learnt a lot about the practical side including how to use all of the equipment in the TV studio and the ‘technical’ terms to do with the equipment on the course.

untitled (6)

Post Production:

The post-production process is always the last section to be completed when making your project. The post production process means getting all of the last minute shots, scenes and re takes and sometimes changing some of the production work that has already been done, and tweaking some of your work/adding in extra changes.

This section ensures that everything in each scene/the full project you have made is made as you want it and adds in anything that you want to change about it or add to it. This makes the process of making the film complete and finalises the project.

This part of the making process doesn’t take long compared to the Pre-Production and Production times, although it is usually the most complicated part of the process as you need to make sure that everything you have shot or taken is how you want it, and that the full project is done to how you planned and within the time limits.

I have had some experience with post production during my time in secondary as we used a few software’s (on macs) to help us edit our work and videos after going out and collecting work for our projects. However since starting college I have been able to develop my skills and become more professional when using the software’s to edit my work and now I am confident to edit all of my work after I have taken all of the practical work I need for each project. I learnt: how to do continuity editing including collecting the shots and editing the shots afterwards, how to add in transitions and different effects to each shot/video added into the editing timeline, how to fade the shots and sounds in and out, syncing audio for each of the videos, adding in text and ending/opening credits etc.

post-production

Video Shot Sizes

There are many rules to consider before taking a picture or video, the angles and shot sizes could completely change the view and focus for each shot. These are some rules you could use to make your photo stand out.

Rules:

  • The Hitchcock Rule: When composing a shot, more visual weight should be given to the most important part of the scene- as shown in the picture below, the woman is in focus and is the main vocal point of the shot, whilst the rest of the picture is blurred and out of focus.
    untitled (8)
  • The Rule of Thirds: The shot is split into thirds vertically and horizontally, to place points of interest on or near the line. it also demonstrates looking space for the subject to look into and gives the audience a greater sense of the scene. In the picture below the horizon is in the top third of the 3 rows, the boat tends to stay in the left hand side and it stays in the 1st and 2nd columns of the 3rds grid.
    untitled (7)
  • Head room: to give make a portrait etc look better, the amount of head and chin space will need to be changed. To place the character correctly in the screen, there needs to be space above the head, and there should always be more chin room than headroom. In the image below the woman has a good amount of head room and also some room below her chin making the shot more like a portrait and places her directly in the centre of the shot.
    Actress Emma Watson poses for a portrait in New York, Friday, July 10, 2009. (AP Photo/Charles Sykes) ... 10-07-2009 ... Photo by: Charles Sykes/AP/Press Association Images.URN:7557891

Shots sizes are very important when taking a photo or video because the size of the shot changes the emotion and feel of the scene and helps create looking space. It also reveals other objects in the scene. These are some shot sizes that you could use to help change the feel of your image.

Shot Sizes:

  • Establishing shot (extreme or long shot)
    This shot introduces the audience to the setting and shows the contrast in vastness of a setting, often revealing something in the shot that the character can see (looking space.)
    untitled
  • Close up (CU)
    Close ups are usually used to show emotion in the scene and within the character, the shot usually shows negative emotions that the character is feeling and evokes sympathy and fear. The shoulder upwards shot allows the audience in close and person- making the characters emotions and expressions have more of an impact on the audience.
    images
  • Extreme close up (ECU)
    The extreme close up is normally used to make the audience focus’ on a certain part of the face (typically the eyes or lips.) Being so in a close to the character/object shows the intensity on a characters face and expressions they’re pulling, it also builds up tension as you cant see anything else in the shot except that character.
    untitled (2)
  • Over the shoulder shot (OTS
    This shot always features two characters; one faces the camera and the other faces away, typically with the head and shoulder (of the first character) creating a frame for the other character.
    untitled (3)
  • Medium shot (MS)
    Tends to be between knees upwards and chest upwards- showing some of the body of the main character in shot. Mainly used to show the body language of the character (s) in the shot and also shows the space between characters and objects in the scene- including the looking space (shown below; the character is looking into the distance.)
    untitled (4)

The camera movement effects the way the objects in the scene look and also reveals the most important characters/objects in the shot. It is very important to take into consideration whether to move your camera or just have a still image, as it will create very different effects either way.

Camera Movement:

  • Pan
    -pivots horizontally from a fixed position
    -usually on a tripod, can be hand held
    -revealing the most important things in the scene
  • Tilt
    -pivots vertically
    -reveals something new in a scene
    -pays attention to the key points of the scene

The composition shots are another thing to consider when taking your shot as it changes the way the audience feels about the scene and what the most objects are in the shot.

Composition Shots:

  • Leading lines
    -directs attention to something in the scene
    -used to grab attention
    -revealing
    untitled (9)
  • Grouping of 3
    -place point of interest
    -looking space
    -dynamic shots
    imagesR3X7MUL2

The angle of the image or video changes the emotion in the scene and the focus also changes from the most important image in the shot and so the angle shots are very important when taking an image or video.

Angles:

  • Point of View (POV)
    Point of view angles tend to represent the subject view of the character and is usually eye level of the character. It also lightens the intimacy an audience feels for the character and makes the audience feel more involved with the characters feelings etc.
    untitled (5)
  • Canted angle
    The camera is placed on an angle and isn’t level with the lines/ background of the scene usually used to imply that something is going wrong in the scene or something bad is about to happen.
    untitled (6)
  • Rack/ Pull Focus
    The rack/pull focus shows the shallow depth of field as the focus changes (the focus moves from object to object) to emphasise the main subject of the shot.
    Matrix-C1

When doing practical with Lee he gave us a task that was to go out (in groups) and collect some of our own shots including getting a variety of shot sizes and angles. Here is my final video from the shots we took (below) we experimented with some of the shots above so that we understand the feel and main reason that each shot:

LINK TO SHOT SIZES

Create a free website or blog at WordPress.com.

Up ↑